Tag Archives: pinterest day

Pinterest Day 3 – Pizza Party Time

I’ve been trudging through my Pinterest boards trying to find something I wanted to make and I kept coming up with nothing. I either didn’t have the crafty items I needed, I felt like the particular craft was too time consuming or convoluted, or the pin wasn’t as cool as I thought it was when I first pinned it.

I went to the grocery store today and I remembered a pin for a pizza recipe I wanted to try so I bought the ingredients I needed to make it. After I got home and started putting the ingredients together it hit me. This will be my Pinterest Day post!

So, I know it isn’t yarn related, but I’ve decided that Pinterest Day doesn’t have to be just about yarny things.

And now I introduce to you, Bubble Pizza!

Here is the link to the pin: Bubble Pizza

You will need:

1 8×8 square baking dish

1 can of biscuits (not the flaky layered kind)

1 jar of pizza sauce

1 package of pizza cheese

Your favorite pizza toppings


Pre-heat your oven to 400F and grease your baking dish. I just used some of the vegetable oil spray.

I used 1 can of 10 homestyle biscuits (the little ones) (7.5 oz). Pop that open and either cut or tear them into quarters and plop them in the bottom of your baking dish. I made sure that the pieces didn’t overlap.

After that, top your biscuit pieces with your toppings. Make sure that any toppings you choose are pre-cooked. We chose pineapple chunks, ham, and sliced jalapenos.

Biscuits with various toppings added.

Biscuits with various toppings added.

Once the toppings have been added, smother that concoction in pizza sauce. I used an 8 ounce jar, but I think next time I will use a little less sauce. Maybe 6 ounces.

Smother in sauce.

Smother in sauce.

Now that you are adequately sauced, top with cheese. I am a glutton so I used an entire 8 ounce bag of shredded pizza cheese. Yum.

CHEESE.

CHEESE.

Toss that glorious thing in the oven and bake for 20-25 minutes. It will be all bubbly and delicious smelling when the timer goes off.

Pizza time!

Pizza time!

This recipe turned out great. It was almost like a deep dish pizza. My husband and I ate the entire thing. Hooray for no leftovers!

I’m excited to make it again using some different toppings. In fact, I think the next one is going to be Ruben-style. Biscuits, corned beef, thousand island, sauerkraut, and swiss cheese… Oh man, that sounds so delicious.

Really, you could turn this into just about anything you want. I may also try to make a dessert style. I’ll likely use some apple pie filling and who knows what else. I haven’t brainstormed that far.

When I try a new variation I’ll try to remember to post an update for you.

I hope you give this recipe a shot. It’s cheap, easy, and you get to use your favorite pizza toppings. I’m sure it would be favorite for kids.

Until we meet again.


Pinterest Day 2: Part 1 – Colored Pencil Fun

It’s that time again, folks. Well… Sort of.

I found a pin in my never ending crafty board that I decided I was going to give the good old college try. This one isn’t yarn related, but I thought it looked pretty awesome and fun.

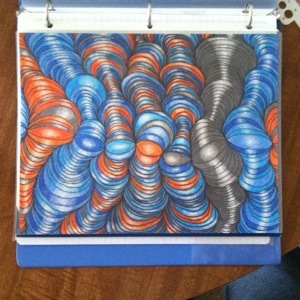
I have been wanting to add some more art to my work space and I figured, “Why not make my own?”. So, I scoured my pinterest board and found this pin. It’s basically an exercise to practice shading and pressure control. It’s cool to see how it develops as you go along, but it does take some time to complete.

Since it has been taking me a while to finish my drawings, I thought I would make this a two part post to show you the progress I’ve made and also give you some time to work along with me if you wanted to. And why wouldn’t you? I’m awesome and this exercise is awesome.

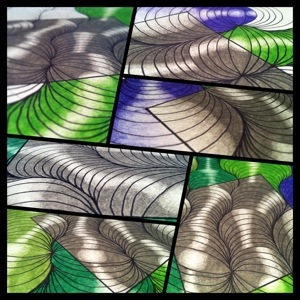
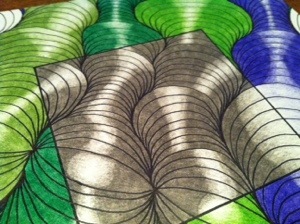
I’ve finished one drawing so far and my second drawing is almost complete. Here are some progress photos:

Drawing one

Drawing one

20140321-181002.jpg20140321-180934.jpg

Second drawing

Drawing two

20140321-181024.jpg20140321-181040.jpg

My husband had the idea to add a “row” of grey to give it a little extra interest. I liked how it turned out in the first drawing so that is what inspired me to add the “window” of grey in the second drawing. Once I’m finished I’ll be looking for some frames to put them in and I’ll hang them on the wall in my work area. I’m pretty stoked.

There will be another update to this Pinterest Day post so I can show you the final pieces and hopefully some shots of them hanging on my wall.

In knitting news, I am making progress on my fourth pair of socks. I’m almost done with them and I am excited to start another pair. There are a lot of photos of them that I have posted to my Instagram.

I hope to have the socks done for my next post and perhaps a couple other FOs for you to look at. Until next time.


Pinterest Day: Granny Squares

Here is the long-awaited and much-anticipated Pinterest Day post. You have probably deduced from the title that we are covering some Granny Squares for this introductory post. Good job, Sherlock Holmes.

I created a board on Pinterest for Granny Squares for the exchange group that I joined a few weeks ago. I wanted to make some different style squares to challenge my abilities and learn some new techniques.

We will cover 5 different squares from my pin board: A Celtic Knot, an owl, a holiday wreath, an open-work square, and 4 hearts in a square.

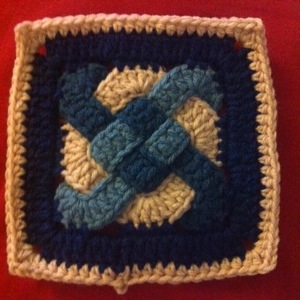
The Celtic Knot:

Celtic Knot Square

Celtic Knot Square

The pin leads eventually to the free pattern on Ravelry by Carola Wijma. This square looked a little intimidating at first, but as I read through the directions it actually turned out really easy to make and I was very pleased with the results. I also liked that I could make two different 6″ squares with it just by changing where the corners of the square are placed. I ended up making this square about twelve times for the exchange because it was so fun and easy and I just love the way it turns out. I definitely recommend making this square.

The Owl:

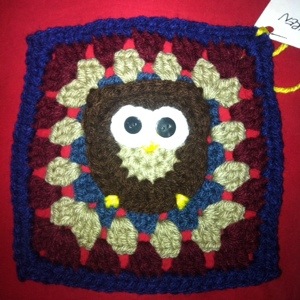
Owl Square

Owl Square

This pin lead to the free pattern on Repeat Crafter Me by Sarah. The directions are pretty clear but I found that I did have to tweak it a little to make sure that the owl was centered correctly. Overall, I was happy with how it turned out and felt as though the pattern was mostly easy to follow. I would recommend making this square but I don’t know if I would make a blanket with these though due to the button eyes.

The Holiday Wreath:

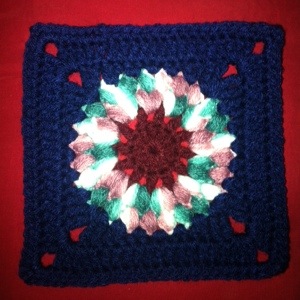
Holiday Wreath Square

Holiday Wreath Square

This pin leads to the free pattern on KaleiDesigns by Melanie Stiles. I used Red Heart Super Saver with a size G hook to get a 6″ square instead of the recommended size that will give a a 7″ square. Even though this is a holiday pattern, you can use any colors you’d like and it still turns out great and doesn’t necessarily scream Christmas.  I’d recommend this square to use for most anything, be it a blanket, a scarf, a pillow, whatever you like. It’s a quick, fun, and easy square to make and it isn’t so mindless that it bores you.

The Open-Work Square:

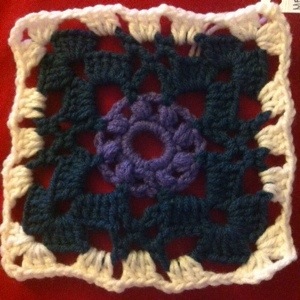
Open-Work Square

Open-Work Square

This pin didn’t really have a link, so I just used the picture of the chart to make it. If you want to make this square you will have to know how to use charts instead of written instructions. I recall having to tweak the pattern a bit but not because it is incorrect, I’m just picky as to where I like to place a ch3 as a dc. I liked how the square turned out but it wasn’t my favorite. It seems a little flimsy to make a blanket out of these squares but it might make a nice accent to a blanket or a pretty scarf or shawl square.

4 Hearts in a Square:

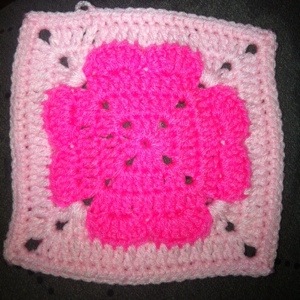
4-Hearts Square

4-Hearts Square

This pin leads to the free pattern on HooksandYarns. I’m having a hard time figuring out the author of the pattern, but I believe it is by Debi Y. I thought that this pattern was cute and since I found it around Valentine’s Day I thought I would give it a shot. The instructions and picture tutorial are very clear and easy to follow. But, being the pain in the ass that I am, I didn’t follow them to the letter. I hate weaving in ends and I hate sewing things down if I feel like I don’t really need to, so I changed the pattern a bit to suit my “style” (style = laziness). Basically, I crocheted the heart tops as one round, working slip stitches in each chain of the corners. Then I changed colors and worked the 4th round as directed, but then with round 5 I tacked down the heart tops by the back loops as I made some of the stitches in the round. It seems complicated, what I did… But it isn’t. I just haven’t figured out a way to explain it very well. Anyway, I do recommend this square. It turned out really nice, and if you looked at the link, you can switch up the pattern to make ice cream cones, cupcakes, or even a 4 leaf clover. Super cute.

I was going to add one more square to this list but as I clicked through the links it eventually lead me to a book. And the book isn’t free so I think the person who posted the pattern just copied out of the book and I am not comfortable linking to it. In fact, I may take it off my Pinterest Board.

So there it is. Pinterest Day. Victory.